
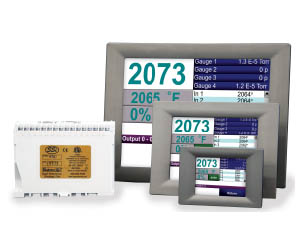
9220 Vacuum Furnace Controller
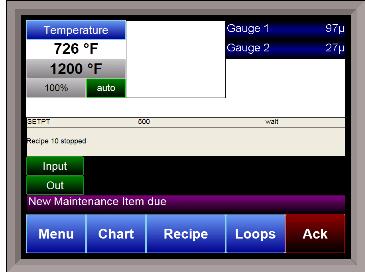
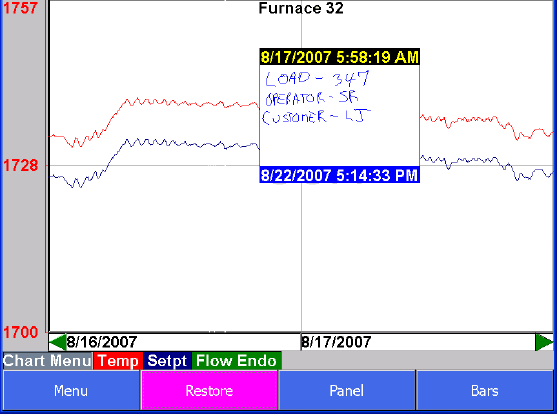
The 9220 is a robust and easy-to-use vacuum furnace recipe controller designed specifically for heat-treaters. The controller has a large full-color touch screen interface which displays temperature, vacuum data, load thermocouples, current recipe status and remaining time. The 9220 is also a paperless chart recorder, enabling real-time and historical analysis of all process variables.


| Programmable Controller; 300 24-Step Recipes |
| Expandable Load T/C Support |
| Direct Connection to Vacuum Gauges |
| Interfaces with most Vacuum Controllers |
| "Outgas" Hold Alarm |
| Load T/C Alarms |
| Recipe Driven |
| Guarantee Soak on Load and Control T/Cs |
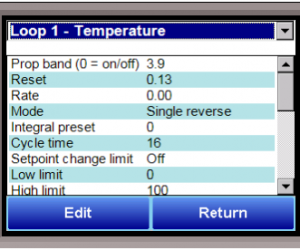
| Multiple Auto-Switching PIDs |
| Video Recorder |
| 16 PIDs via program opcode |
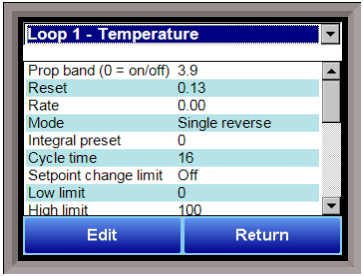
| 3 PID sets / loop with defined temperature switch point |
| T/C comparison with offset available for T/C checks |
| Multiple alarms assigned to individual relays or a single relay |
| "0.00" setpoint deactivates control output |
| Band limits for each process variable |
| Remote setpoint for third input |
| Control Loops | Temperature and Vacuum (three loops of control) |
| Analog Inputs | Three |
| Analog Outputs | Two (0-20 mA or 4-20mA) |
| Digital Inputs | Four |
| Digital Outputs | Eight relay outputs (Expandable to 16 or 32) |
| Communication Ports | One (1) - RS232 Three (3) - RS485 Ethernet |
| Display | 3.5", 5.7", 12.1", 15" and 17" Color touch screen Video recorder with "NOTES" capability Removable storage media (948 months of data) PC interface with SuperDATA |
| Programmable | 300 24-Step Recipes Vacuum specific "opcodes" |
| Events | User Defined |
| Web Browser Enabled | Remote PC view with standard Web Browser |
| Mounting | DIN rail or sub-panel mounting |
| Power | 24 VDC |

This message is generated when the HMI does not have communications to the controller inside the panel. Possible reasons for this include:
Loss of 24VDC power to terminals 1 (-) and 2 (+) on the controller.
A bad communication cable between the HMI and the controller.
(Check by ringing out the cable end to end, or checking for continuity.)
Bad connection between the HMI and the controller.
(Check both ends to make sure they are securely connected and not loose or damaged.)
Cable connected to wrong port on back of HMI.
(COM1=232 and COM3=485)
SOAK is simply a specified amount of time. There are no conditions required for the timer to count down.
G_SOAK is also a soak timer, but it will only run when pre-set conditions are met and maintained. If conditions are not met, the timer is placed in hold status.
See our Schematics and Drawings Page for wiring info.
Navigate to “Slave Instrument Setup” (This may involve logging in).
Select an instrument you want to configure and tap “Edit.” Note that the list of available instruments is color coded:
Blue=atmosphere
Red=temperature
Yellow=events
White=user-selected instrument
Configure the instrument, address, and port. Note the following:
All devices on the same slave port must utilize the same protocol.
An address of zero (0) will disable the instrument.
Controllers that provide dual functions must have the same address assigned for both.
If your instrument is not shown in the list, use User Instruments 1-16 along with the Generic Instrument Setup menu (see manual for additional details).
Slave 1 = terminals 5 (-) and 6 (+)
Slave 2 = terminals 22 (+) and 23 (-)
RS-232 = 9-pin port on controller’s face